…
Safety and preparedness are two of the most important factors to ensure a fun & successful day of four-wheeling. Any off-road driver knows the likelihood of a vehicle related issue increases once you get off of the pavement, but the impact can be minimized if you are physically and mentally ready. The issue may be anything from something with your own vehicle, a friend’s rig or a rogue Prius that has driven somewhere they don’t belong. Either way, would you know what to do in the event that you needed to recover a vehicle stuck on the trail?
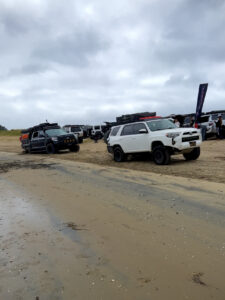
On the overcast morning April 10, 2022, Brandon and I had the honor of assisting Sam Dean of Deadman Off-road, along with fellow Deadman ambassador Alexandra @ali.venturer, present an all women’s vehicle recovery & safety course for the ladies of SoCal Missfits off-road group. Maria from the MissFits organized this gathering for the women of SoCal Missfits to get hands-on learning of their own vehicle recovery equipment kit and how to use it safely for a successful recovery. No vehicle recovery can be a success if someone gets hurt. Their local weekly hangout spot of Fiesta Island in San Diego supplied the perfect location to simulate real scenarios of recovering a vehicle stuck in the sand.
The plan of meeting on the sandy shores of Mission Bay was thwarted by the San Diego Beach and Bay Half Marathon, 10K & 5K. Not to worry, overlanders and off-roaders by nature are like willow trees, capable of moving with the breeze and working past the challenge in front of them. With a little research and recon, we learned we would simply have to take our course to the nearby pavement parking lots for an hour of equipment review before being able to cross the road onto the sands of Fiesta Island. This was the perfect opportunity to circle up and breakdown the process of recovering a vehicle, either self-recovery or recovering someone else.
I’ve always loved the acronym “KISS” (keep is simple, stupid) when considering the step-by-step processing for well… anything. Personally, I tend to overthink EVERYTHING which can often make things more difficult than they have to be! I feel like the “KISS” concept works extremely well when working through the vehicle recovery process. Basically, start with the small and obvious potential solutions and then work your way down the list for the solution that works best. First, I always recommend avoiding going out exploring solo, if at all possible. In the event that something should go wrong, having other vehicles around increases the options for recovery. Plus, it is just more fun to wheel with friends. I know what you’re thinking, you travel alone most of the time. Yes we do, and we are equipped with front and rear winches and more recovery equipment than you can shake a stick at in order to increase our chances of a successful self-recovery.
So, what do you think the first thing you should check when your vehicle gets stuck, lets say, in the sand? (Hint- this is an easy one, you don’t even have to get out of the truck!)
-Check to see if you are in four-wheel drive
I know it seems obvious, but it happens more than you think. There is something about being on a dirt road trail that tricks the mind into thinking the 4×4 should already be engaged. Either way, making sure all four wheels are working to gain traction is the easiest approach for getting unstuck. This is what I call a “duh moment”- I have a lot of these.
-Air down your tires
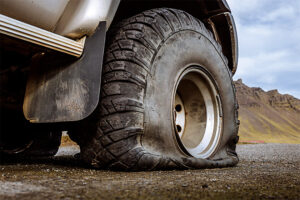
Maybe not this far!
Airing down the tires elongates the tire and increases the surface area that makes contact with the ground. This naturally helps the tire float on top of the soft sand, deep snow or thick mud, rather than having to work to cut through. Think snowshoe- the larger surface area of a snowshoe helps you walk on top of the snow, rather than sinking into the deep snow with regular boots.
The general rule of thumb for airing down is half of your tires regular PSI, and no less than 15 PSI unless you’re running beadlocks.
The next steps are going to be situational depending on the terrain, if you can remain safe during the recovery attempt and personal preference.
-Traction boards and shovels
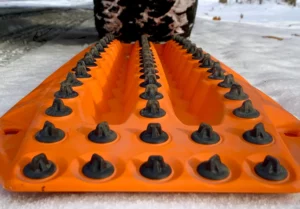
Traction boards can also be used as a shovel!
Traction boards have become a status symbol for overlanders across the world displaying one’s commitment to going the extra mile and risking getting stuck in the process. Easily spotted on a 4×4 vehicle as the weird looking, spiky, surfboard-like planks mounted to the exterior of the vehicle. These boards do exactly as the name implies- provide a surface to gain traction under the wheels doing the work.
With your shovel or the short end of your traction board, you would dig enough earth from under the tires to place the traction board and simulate a solid surface. Next place the traction board, spiky side up, just before the wheel in the direction you intend to drive to free yourself (forward or backward). Leave a slight gap between the board and the wheel, natural momentum of acceleration will help the tires grab the board. With slow, deliberate acceleration (no spinning tires here), the boards grab under the tread of the tire and allow the vehicle to gain traction. With traction and momentum, the driver can maneuver to a safe, unstuck location. Sometimes this process needs to be repeated a few times to be completely in the clear, but it is a simple way to get the momentum started to drive out on your own.
Traction boards are labeled as being great for all terrain. In my opinion, traction boards and mud do not usually go together well. If your tire treads are caked with mud, the traction boards will have a tough go at finding the grab needed to help gain momentum to get moving. It’s like Velcro… you need both sides for it to work the way it is intended. However, if this is your only option, it is worth the try.
Your shovel is also a useful tool for moving soil out of the way. Sometimes you simply have to dig your vehicle out, like digging out of the snow. When buying a shovel, keep sizing in mind. Small shovels may save on precious storage space, but would you want to spend all day digging your rig out of the snow with a tiny shovel? Also, consider handle length. Someone six foot tall may want to consider a longer handle, where someone closer to five feet could get away with a shorter handle.
At this point we were finally able to get on to the sand and it was my turn to “get stuck”. Alexandra and I we able to demo a “snatch rope recovery” between her Toyota 4Runner and our Toyota Tundra. Honestly, I probably had more fun “burning rubber” in the sand trying to bury the back tires.
-Kinetic rope
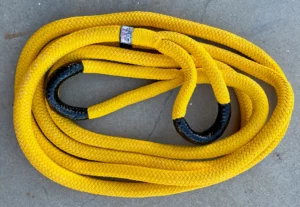
Deadman Offroad Kinetic Rope
A kinetic rope, also called a snatch rope or yanker rope, is essentially like a giant rubber band that can stretch up to 30% under load and is designed to smoothly transfer kinetic energy of movement from the recovery vehicle to the vehicle that is stuck. The recovery vehicle moves, stretching the rope then the rebound of the rope transfers the energy into the stuck vehicle, pulling it free in the process. Even a smaller vehicle can recover a much larger vehicle with the help of momentum and kinetic energy (like Ali’s 4Runner that was about half of the weight of our Tundra). The stretch factor of the kinetic rope also helps reduce the stress load placed on each vehicle during the recovery. So if you have a friend’s rig or a friendly passerby handy, this is a great way to get out of the muck!
Kinetic ropes should not to be confused with a tow strap. Tow straps are designed to be used when moving a vehicle that requires constant, steady connection. Tow straps are solid straps of fabric that will rip off bumpers if you try to get a running head start.
-Soft shackle vs. Metal shackle
When using recovery equipment, you obviously need some sort of adapter to attach your rope ends to the vehicle. Sam pointed out the differences between a metal shackle and soft shackle and reviewed some of the pros and cons for both.
–Soft shackle– usually made from the same material as a synthetic winch line, soft shackles are lightweight, easy to maneuver and safer than their metal counterparts. In the event of a breakage during a recovery- no flying metal! Soft shackles can carry maximum breaking strengths upwards of 30,000lbs (always verify the factory tested maximum breaking strength for your own equipment prior to use). The lightweight, flexibility allows for easy storage while reducing overall weight in the vehicle. When using soft shackles, always check for wear and abrasion. Breakdown of the material overtime can reduce the strength and reliability of the shackle. Also, when using soft shackles keep in mind if your recovery point is sharp or a rounded edge. Sharp recovery point edges can cut through a soft shackle like a hot knife in butter.
–Metal shackle– often mis-labeled D-rings, these shackles are extremely durable and don’t cause the same concern for material breakdown over time. Heck, you can leave these outside on the vehicle for easy storage. When you attach the metal shackle, you want to make sure you “screw down” the pin into the threaded side of the loop. This ensures that vibration during use does not cause the pin to fall down and out, potentially resulting in recovery gear flying. If you leave them attached to the vehicle also keep in mind you’ll need to check the pin occasionally to ensure that it has not seized. We learned that these shackles are best used when pulling in a straight line. Metal shackles are not intended to be used with any deviation of the line more than 30 degrees side to side. Also, keep in mind that if there is a failure during recovery with a metal shackle, the likelihood of damage or injury with be far worse than the soft shackle option.
When shopping to fill your own personal recovery gear kit, Sam made sure to express the importance of checking for two very special numbers on the label.
–Minimum Breaking Strength (MBS)– maximum force a rope can be pulled in a straight line pull before it will break. The larger number, maximum load to be placed on the rope.
–Working Load Limit (WLL)-this is the maximum allowed weight the piece of equipment can manage under normal conditions. The WLL is a ratio of the breaking strength rating, usually one third to one fourth of the MBS (ex. if the WLL is 6,000lbs, the MBS could be 18,000lbs or 24,000lbs- depending on the manufacturer’s rating).
Check the tags and markings on the label. If there are no tags or you’re just not sure, do some research or invest in a new piece of equipment with the proper labeling. Most people also shop for gear based on their own vehicles gross vehicle weight rating (GVWR), but if you plan to wheel with friends that are larger/heavier than you, you may want to size up. Most often, you’ll be recovering someone else when in a group (hopefully).
I know this is not a comprehensive list of all of the recovery equipment available or possible ways to recover, but with our short time and all of the wonderful questions we answered, this was a great start! Sam and the SoCal MissFits intend to have more courses in the near future to cover winches and winching basics, review off-road communications and first-aid on the trail.
I have a significant amount of respect for the proactive nature of the women of the SoCal MissFits. Being prepared is the best defense when problems arise. Taking the time to practice potential real life problems, like getting a vehicle unstuck, builds confidence and takes panic out of the equation when it really happens on the trail. I am proud to have been part of an opportunity to help other women grow and thrive. Congratulations on setting an marvelous example, SoCal MissFits!
